Smart Doorbell Installation in Orange County: Wiring, Wi-Fi, Stucco Mounts, Costs, and the Mistakes People Regret (2026)
Last updated: March 1, 2026
Installing a smart video doorbell sounds simple until it isn’t.
Most guides obsess over brand features and skip the real reasons installs fail: underpowered transformers, chime weirdness, weak Wi-Fi at the front door (not in your living room), and sloppy mounting on stucco or brick.
This post is written for Orange County homeowners, landlords, flippers, and DIYers who want the doorbell to actually work the way the ads promise. It’s intentionally brand-neutral, but I’ll reference popular options like Ring, Google Nest, Eufy, Wyze, and Blink because people search those names.
Disclosure: Brand names are used for identification only. We’re not affiliated with or endorsed by any manufacturer.
The 10-second reality check
A smart doorbell isn’t a dumb button. It’s a small camera computer that needs steady power and a stable network.
When either one is borderline, you don’t just get “slightly worse performance.” You get:
- random disconnects
- delayed notifications
- chime buzzing or not ringing
- battery that drains fast
- a constant urge to blame the device when the real issue is the house setup
If you read nothing else, remember this: power + chime + Wi-Fi + mounting decide your result. Brand is secondary.
Quick chooser: pick the right install path first
Option A: Battery-first (lowest risk, fastest win)
Choose battery-first if:
- you don’t want to touch wiring
- you suspect your transformer is old/weak
- you’re in a condo/HOA situation
- you just want it up and working
Battery models are also great for “front door Wi-Fi is weak” situations because you can test placement and angle before you commit.
Option B: Hardwired (best stability when your system is compatible)
Choose hardwired if:
- you want always-on power
- you already have a normal wired doorbell setup
- you’re willing to confirm transformer compatibility and follow the required chime steps
Hardwired is the most stable outcome when your home supports it.
Option C: Don’t force it
Choose “don’t force it” if:
- your home has an odd doorbell/intercom setup
- you can’t locate/verify the transformer
- the chime behavior is weird (buzzing, weak rings)
- your front door is a Wi-Fi dead zone
In those cases, the “smart” move is often battery-first or professional help, not brute-forcing a hardwired install.
The 4 things that decide whether this is easy or a headache
1) Power: voltage matters, but VA is the hidden killer
Most doorbells operate on low voltage from a transformer. Smart doorbells often list both a voltage range (VAC) and power capacity (VA) they can work with.
Here are real examples directly from manufacturers:
- Ring lists different transformer requirements depending on model (examples include 10–24 VAC and VA ranges like 8VA–40VA; other models require 16–24 VAC and 10VA–40VA).
- Google Nest lists transformer requirements and also notes chime compatibility (examples include 16–24 VAC, 10VA minimum for the wired model; battery model can use 8–24 VAC, 10VA for wiring).
- Blink’s support page explains transformer/voltage compatibility (examples include 8–24 VAC with a maximum of 40VA) and also notes batteries are still required even when wired for some models.
- Eufy’s support docs show model-specific requirements (one example lists 16–24 VAC at 10VA with max 40VA).
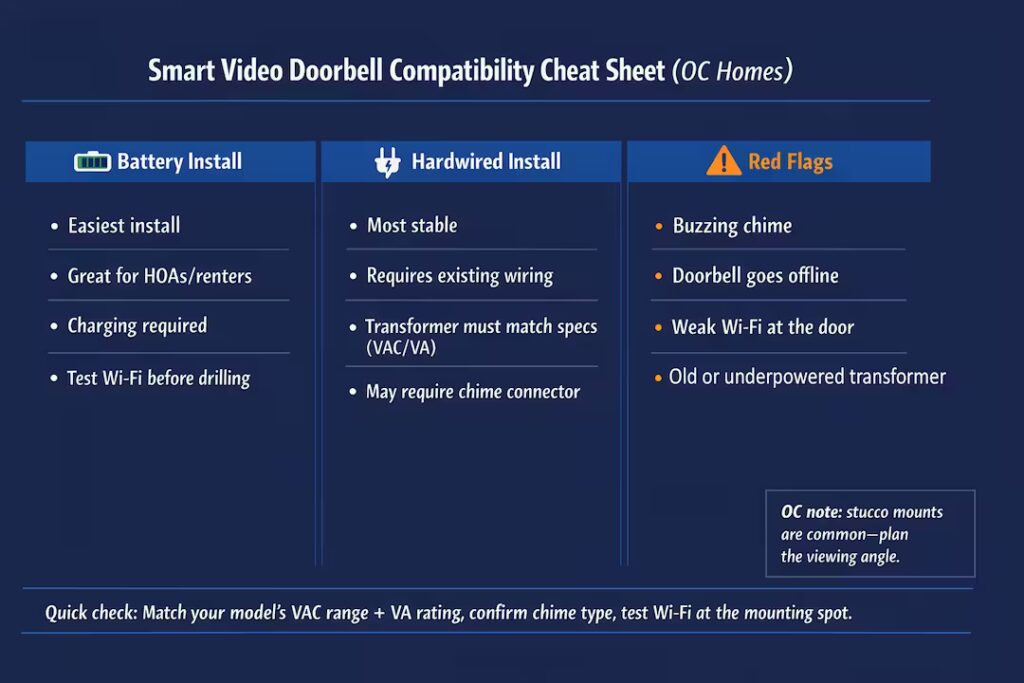
Why this matters: old-school doorbells didn’t need much power. Video doorbells do. If your transformer is underpowered, you can see weird symptoms that look like “bad device,” but it’s really power delivery.
2) Chime setup: the little connector that prevents big problems
A lot of smart doorbells require a chime connector / chime controller / power kit so the doorbell can get steady power and the chime doesn’t behave badly.
A clear example: Google Nest states the wired model must be used with the included chime connector when connected to a wired chime.
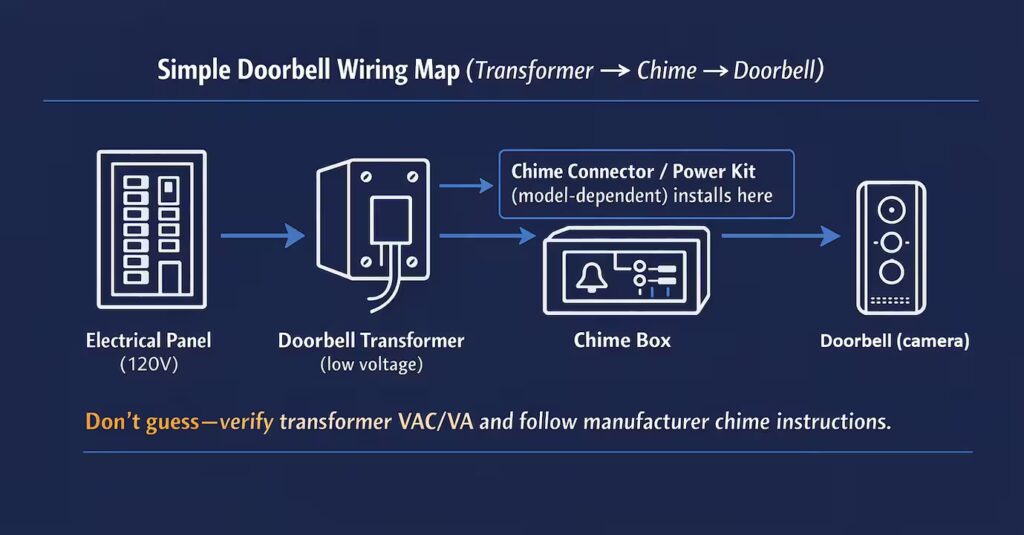
Wyze sells a chime controller specifically to make doorbell cameras work with existing mechanical chimes, and also emphasizes voltage/transformer considerations for reliable chime ringing.
Translation: if your model requires the connector and you skip it, don’t be surprised when you get buzzing, ghost chimes, or no chime.
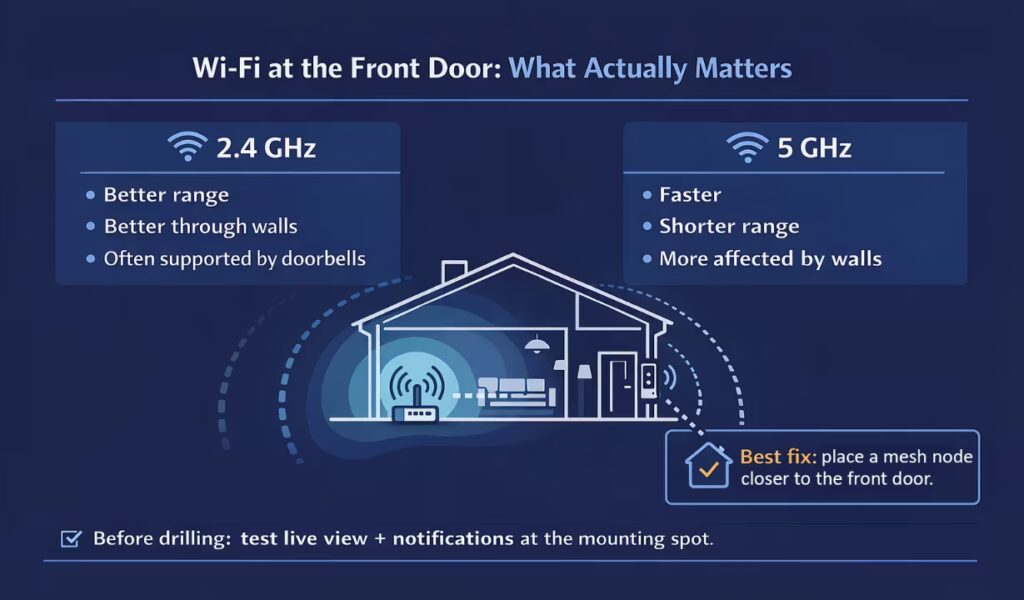
3) Wi-Fi at the front door: the silent performance killer
Your doorbell lives at the edge of your Wi-Fi. That’s why a doorbell can be “connected” and still feel laggy or unreliable.
Google Nest’s specs even call out network requirements (including a minimum upload speed example per camera).
What actually helps in real homes:
- Test live view at the final mounting spot before you drill permanently.
- If signal is weak at the door, a mesh node placed closer to the entry often fixes “offline” issues better than swapping doorbells.
- Many devices perform better on 2.4 GHz for range, but your specific model decides what bands it supports.
4) Mounting surface: Orange County stucco makes or breaks the install
OC is loaded with stucco, brick, and stone finishes. Mounting on wood trim is forgiving. Mounting on stucco wrong can crack the finish, look crooked forever, or invite water intrusion.
Here’s the pro mindset:
- Angle first. If the camera angle is wrong, you’ll miss faces and packages.
- Bracket choice matters. Wedge and corner mounts aren’t cosmetic. They fix your view.
- Finish matters. A clean mount looks intentional; a rushed one looks like a gadget screwed to your wall.
The “before you buy” checklist (3 minutes that saves hours)
Before you choose a model, answer these:
- Battery-first or hardwired?
- Do you have existing doorbell wiring at the location?
- Can you locate your transformer and read its label?
- Do you have a standard wired chime, and does your model require a connector?
- Is Wi-Fi strong at the front door, right where the device will live?
- What surface are you mounting to: wood, stucco, brick, stone?
If you can’t answer #3 or #5, don’t panic. It just means you should either (a) choose battery-first or (b) plan for troubleshooting.
Ring Doorbell Installation in Orange County: Power, Chimes, and Common Issues
Ring installs are usually straightforward if you match the doorbell to your home’s wiring and power. Where people run into problems is assuming “wired is wired” — but Ring’s transformer requirements vary by model.
Power requirements (the part that causes most problems)
Ring lists different transformer ranges depending on which model you have. For example:
- Some Ring battery doorbells and the Video Doorbell Elite are listed as 8–24 VAC with 5VA–40VA.
- Video Doorbell Wired is listed as 10–24 VAC with 8VA–40VA.
- Pro / Wired Doorbell Plus / Wired Doorbell Pro models are listed as 16–24 VAC with 10VA–40VA.
Why you care: if your transformer is underpowered, you can get flaky behavior (random disconnects, weak chime behavior, or inconsistent performance).
Chime reality (this surprises people)
Some Ring wired models require changes to how your indoor chime works. For example, Ring states that with Video Doorbell Wired, the existing chime must be bypassed and will no longer sound (you’d use a Ring Chime or compatible speaker instead).
Ring also notes that some models may need a diode for digital chimes and provides model-by-model guidance.
Mounting in Orange County (stucco is the difference-maker)
If you’re mounting on stucco/brick/stone, the install isn’t “hard,” but doing it clean is what separates a pro result from a crooked gadget on the wall. Plan the camera angle first, use the right wedge/corner mount if needed, and don’t drill before you confirm the view and Wi-Fi at the door.
Quick Ring-specific troubleshooting
- Buzzing or weird chime behavior: often a chime compatibility/setup issue (model-dependent).
- No indoor chime: some Ring wired models require bypassing the existing chime.
- “It’s wired but still acts weird”: double-check transformer voltage/VA matches your exact Ring model.
Where is the transformer? (and why finding it is half the job)
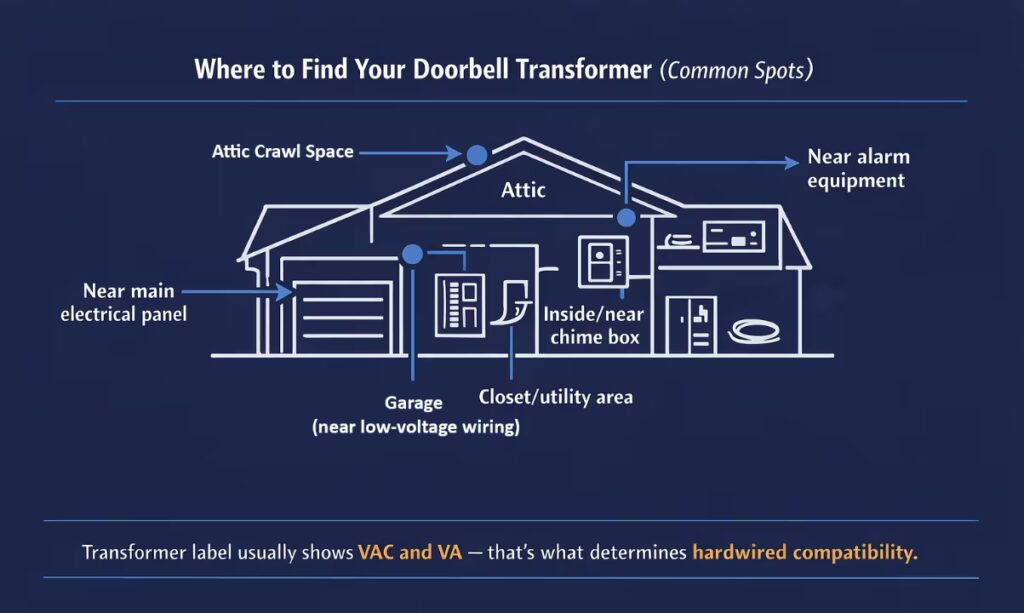
Transformers are often located:
- near the main electrical panel
- inside or near the chime box
- garage or attic
Blink’s support docs list common transformer locations and explain that the transformer reduces household voltage down to doorbell voltage.
Important safety note: transformer replacement or anything involving household voltage is where projects stop being “simple.” If you’re not comfortable, don’t gamble.
Troubleshooting: fix the right thing, not random things
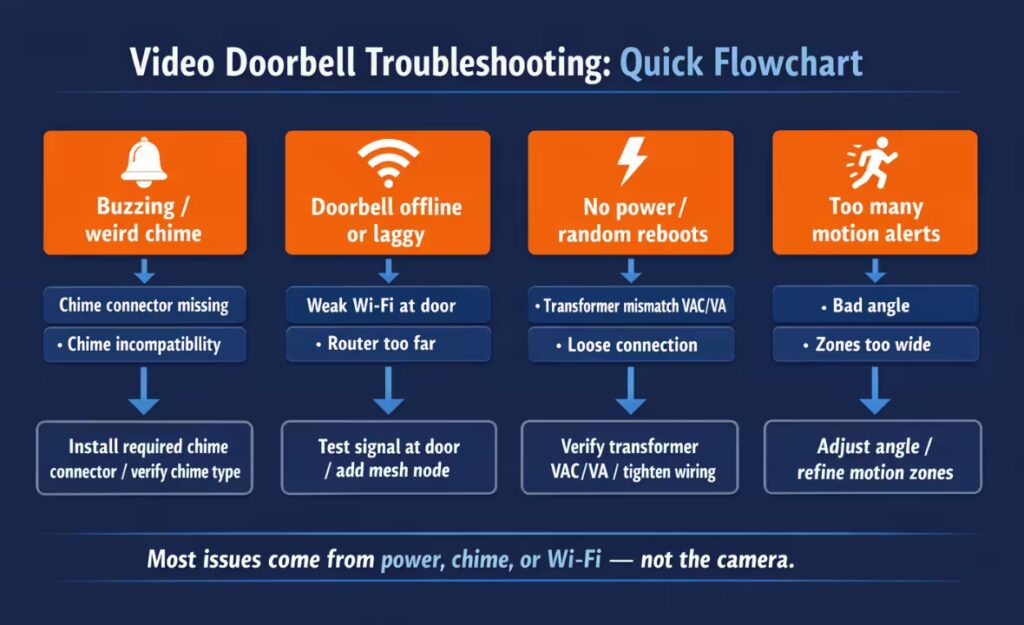
Most problems fall into four buckets:
Problem A: No power or random reboots
Likely causes:
- transformer mismatch (VAC/VA)
- loose connections
- required chime connector not installed (model-dependent)
Problem B: Buzzing chime or ghost chimes
Likely causes:
- missing required chime connector (common on certain wired setups)
Problem C: Doorbell offline or delayed notifications
Likely causes:
- weak Wi-Fi at the door
- poor mesh/router placement
- doorbell stuck on a weak band or congested channel
Problem D: Motion alerts are nonstop or useless
Likely causes:
- bad angle
- motion zones too wide
- reflections/traffic triggers
What it costs to install a smart video doorbell in Orange County (2026)
Let’s not pretend there’s one magic “install price.”
A video doorbell install can be a quick mount-and-setup, or it can turn into chime troubleshooting, transformer detective work, and fixing a Wi-Fi dead zone at the front door.
National price anchors (so you know the market reality)
- HelloTech lists smart video doorbell installation starting at $99.
- Geek Squad lists “Video Doorbell Install” at $149.99.
- Angi lists a typical install cost around $300 on average, with many projects in the $250–$400 range, and smart doorbell installs that can run higher depending on complexity.
What most installs cost in Orange County (realistic scope-based pricing)
Most installs land in a predictable range. The variables are usually the home setup: stucco / brick mounting, chime compatibility, power / transformer issues, or weak Wi-Fi at the front door.
- Battery install: from $149 (most: $149–$199)
- Hardwired swap (existing wiring): from $229 (most: $229–$299)
- Stucco/brick/stone: +$49 to +$89 (only if needed)
- Diagnostic (power/chime/Wi-Fi): $99 (credited if we proceed same visit)
- Second device same visit: $99–$149 (often a doorbell + one camera)
Most installs are completed in one visit. If you text a couple photos of the doorbell location and your chime (if you have one), we’ll give you a clear range before scheduling.
California licensing reality (short and honest)
California raised the minor work exemption to $1,000 starting January 1, 2025, with important conditions: the work can’t require a permit, and the unlicensed person can’t employ anyone for the project.
Here’s the simple way to keep this clean in practice:
- Basic swaps and setups are one category.
- Anything that becomes permit-triggering, new wiring runs, or household-voltage transformer work is a different category.
If you’re a homeowner, the point is not “gotcha.” The point is: do it safely and correctly, and don’t create liability for yourself.
What we see in Orange County homes (real-world patterns)
This is the part national guides miss:
- Stucco mounting is the default in OC, not the exception. The difference between a clean mount and a janky one is immediately visible.
- In older pockets (like Anaheim Colony Historic District), we more often see older transformers and odd chime behavior.
- In newer areas (like parts of Irvine), wiring is often cleaner, but Wi-Fi layout can still be the weak link if the router sits deep inside the home.
Real scenarios (so you pick the right option)
Scenario 1: “I have an old wired doorbell and want a video doorbell.”
If transformer and chime are compatible, a hardwired swap is a clean win. If the chime buzzes or behaves weirdly, the fix is often the required connector, not a different doorbell.
Scenario 2: “My doorbell keeps going offline.”
Treat it like a Wi-Fi problem first. Fixing front-door signal often solves it permanently.
Scenario 3: “I don’t want cracks in my stucco.”
Plan angle, bracket choice, and finish. If you mount it wrong once on stucco, you’ll stare at it every day.
The photo checklist (this makes quotes and installs fast)
If you want a fast, accurate quote (or you’re deciding DIY vs pro), take:
- wide photo of the doorbell location
- close-up of the mounting surface (stucco/brick/wood)
- photo of your indoor chime (if you have one)
- optional: transformer label photo if safely accessible
- quick note: “Wi-Fi is strong/weak at the front door”
This single step prevents most “surprise” install problems.
Quick FAQs
ABOUT OC BROS
We’re a locally trusted team serving Orange County. We install smart video doorbells the clean way — correct camera angle, clean mounting (especially on stucco), and a stable setup that actually performs.
If you’re not sure whether your doorbell should be battery or hardwired, or you’re worried about buzzing chimes / weak Wi-Fi at the front door, text us a few photos and we’ll tell you what’s realistic before you schedule.
NEXT STEP
- Want the smoothest install (and the cleanest look)?
- Pick the final mounting spot first, test the camera view, and confirm Wi-Fi is solid at the front door before drilling anything permanent.
- Want the fastest quote and best results? Text 3–5 photos and we’ll reply with a clear range and the next available window:
- doorbell location (wide shot + close-up)
- mounting surface (stucco/brick/wood)
- indoor chime (if you have one)
- optional: transformer label (only if easily accessible)
- note your city + any HOA restrictions
- Need it done right the first time (no buzzing, no offline issues)?
- Tell us if it’s battery or hardwired, and whether your front door Wi-Fi is strong or weak — that’s usually the deciding factor for a “quick install” vs troubleshooting.
READY TO UPGRADE YOUR FRONT DOOR SECURITY?
Skip the guesswork. Text photos to (657) 776-2336 and we’ll tell you the cleanest, most reliable setup for your home — whether that’s a quick battery install, a hardwired swap, or a setup that needs Wi-Fi/power troubleshooting first.
Takes less than 2 minutes • No name, email, or credit card required